dunz
Boosting 10 psi

Posts: 30
|
Post by dunz on Aug 8, 2019 11:39:14 GMT -5
As part of the diagnosis found in the following thread, a know exhaust leak was found to have a large effect on displayed AFR: stinger-performance.proboards.com/thread/7193/strange-fueling-problems-trying-initial?I've been mulling over the best way to fix it, and in my mind there are a few options. Here's what I came up with in order from cheapest/least effort up to more expensive/ highest effort: 1. Weld slip fit closed (Exhaust becomes one piece from turbo to tip) 2. Weld slip fit closed, add V-band or other connection at bottom of DP 3. Remake DP portion, add V-band or other connection at bottom of DP 4. Totally new exhaust What is everyone's thoughts? Shown below is the current slip fit with tabs.  |
|
|
|
Post by Stinger on Aug 8, 2019 13:02:36 GMT -5
Slip fits require clamps to seal (as you've found) UNLESS it's a precision fit piece with 3 total layers (internal and external flange that a third pipe slides in between like is used for some header collectors).
I prefer v-band clamps in that location but ultimately how you fix it depends on your personal need to disassemble it at that location or if you'll be fine unbolting it from the back of the turbo.
|
|
dunz
Boosting 10 psi
Posts: 30
|
Post by dunz on Aug 8, 2019 13:25:13 GMT -5
Slip fits require clamps to seal (as you've found) UNLESS it's a precision fit piece with 3 total layers (internal and external flange that a third pipe slides in between like is used for some header collectors). I prefer v-band clamps in that location but ultimately how you fix it depends on your personal need to disassemble it at that location or if you'll be fine unbolting it from the back of the turbo. V-Band is ultimately where I want to go with it. Ultimately though, I want to completely re-make the system. There was not enough space in the area for a clamp (it immediately goes into the 90 deg fwd bend to the turbo starting at the top of the flange), and it is DEFINITELY not a precision fit. I think it'll happen in three steps. Assuming I can get it off the turbo without too much fuss as one piece I'll: 1. Weld the slip fit shut This will allow me to get the car tuned and at least get back on the road fairly quickly. If it presents trouble getting it off of the turbo, add one more step: 2. Cut in straight section of DP, add 3" walker clamp After things have settled down and I have more time/budget: 3. Remake Upper DP, add V-band to rest of exhaust. And ultimately: 4. Remake center and rear portions of exhaust. Add high-flow muffler, move exit to driver's side. For expediency I may just show up with the muffler and have a muffler shop do it. |
|
|
|
Post by Stinger on Aug 8, 2019 14:01:27 GMT -5
Yeah, that's why we only offer our 3" elbows as a "ready to weld" or with a v-band, there just isn't room for a slip fit plus clamp, or really any other clamp type other than a header collector flange (which is inferior to a v-band).
|
|
xrjoe
Boosting 10 psi
Posts: 36
|
Post by xrjoe on Aug 11, 2019 10:01:41 GMT -5
Cossie hot side in an XR4Ti? I'd go option 2 or 3...and then #4 if you have the time. I wouldn't waste time with #1. This is what I did to get it to clear the firewall, and allow room for a v-band: 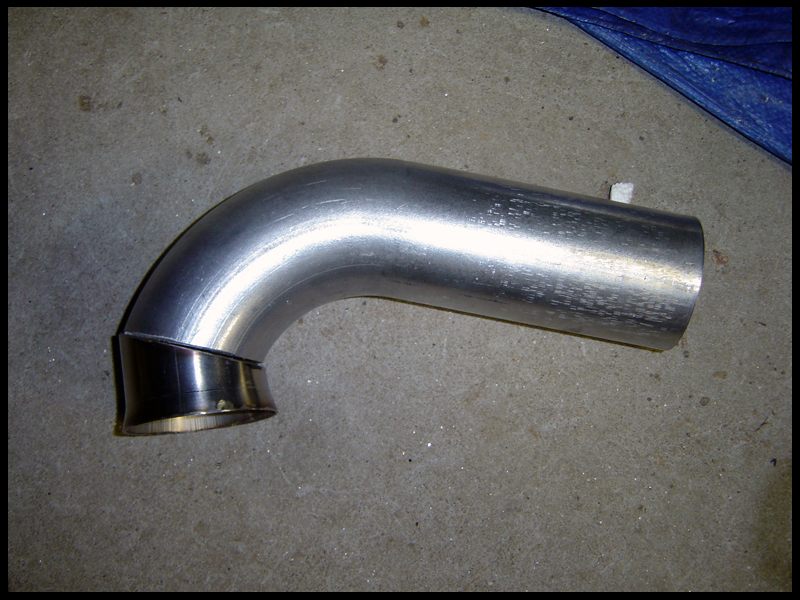 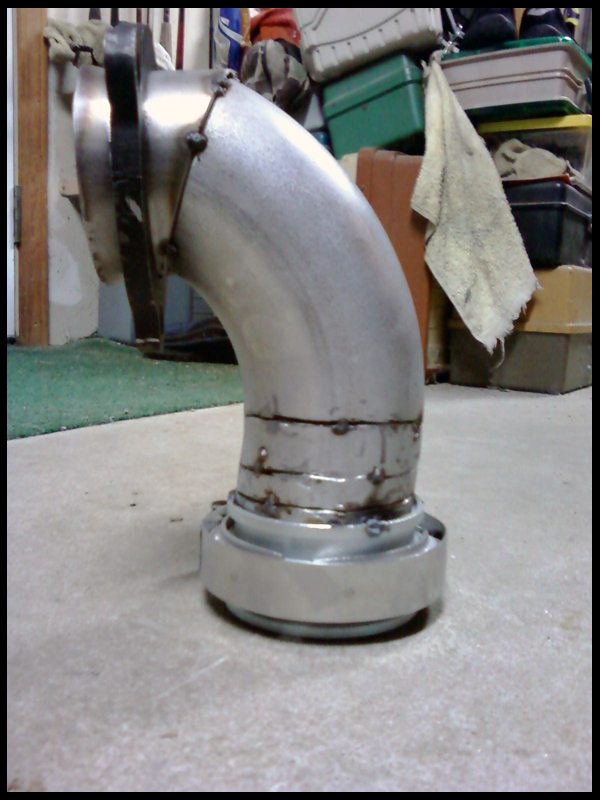  I also suggest running a flex joint if you can (different turbo and location, no way to get this smooth of a bend with a stock location manifold): 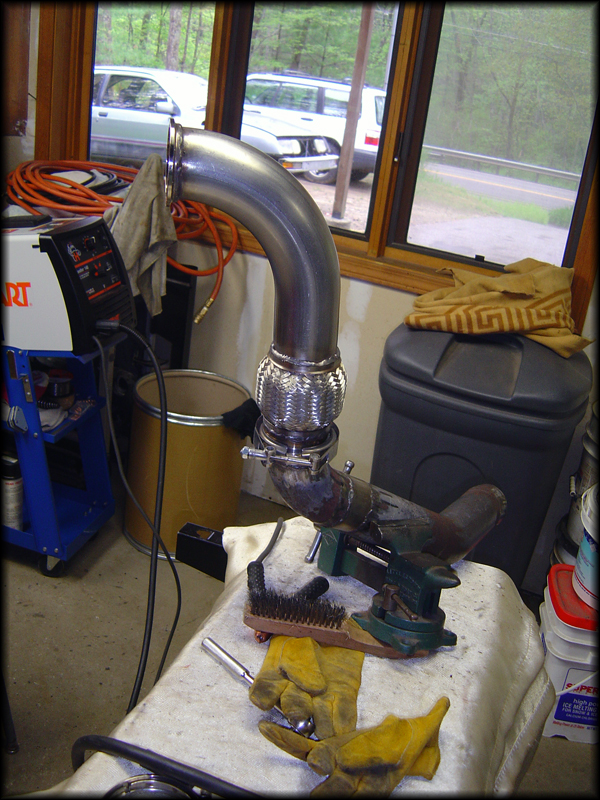 |
|
dunz
Boosting 10 psi
Posts: 30
|
Post by dunz on Aug 12, 2019 10:58:37 GMT -5
Cossie hot side in an XR4Ti? I'd go option 2 or 3...and then #4 if you have the time. I wouldn't waste time with #1. This is what I did to get it to clear the firewall, and allow room for a v-band: I also suggest running a flex joint if you can (different turbo and location, no way to get this smooth of a bend with a stock location manifold): I've basically already decided on #2 for an immediate interim solution. Going with a Walker clamp, but definitely at least remaking the DP in a similar config to yours and adding a V band. There is a flex joint, but it's down in the straight section after the DP (just after the WB O2 sensor location). I'm digging into it tonight. The flex joint would be the only way that the exhaust could even remotely be removed as one piece. |
|
dunz
Boosting 10 psi
Posts: 30
|
Post by dunz on Aug 12, 2019 23:28:58 GMT -5
Jumped in and did the exhaust tonight. (Picture heavy inbound) Welded up the slip fit (I'm a grinder not a welder, it should seal though), Cut it in the straight section of the downpipe and Added a clamp over the butt joint. This is an interim solution! I just need something that will get me on the road so I can get some tuning done; I'll come back in the future and remake the whole downpipe section.      |
|
|
|
Post by Stinger on Aug 13, 2019 0:58:09 GMT -5
Should do the trick.
If you want the welds to be less "bulgy", turn down the wire speed or turn up the heat. I typically turn the wire speed down until it starts to pulse because the wire burns faster than it's coming out, then turn it up until the pulse goes away and you get the smooth "sizzle" sound.
|
|
dunz
Boosting 10 psi
Posts: 30
|
Post by dunz on Aug 13, 2019 6:51:50 GMT -5
Should do the trick. If you want the welds to be less "bulgy", turn down the wire speed or turn up the heat. I typically turn the wire speed down until it starts to pulse because the wire burns faster than it's coming out, then turn it up until the pulse goes away and you get the smooth "sizzle" sound. Yes! As I went I kept turning the feed speed down. it probably could have gone even lower. Power was on 2/4 on a Hobart 140, on exhaust tube I didnt want to go up on that. I think the problem was gun angle and technique, especially since it was the first time I had done a lap joint. Probably needed to start on the base, or lower piece, and pull the puddle up (down in this case) to the top piece, as well as keep turning the gun to keep it closer to perpendicular to the piece. Always learning. |
|
dunz
Boosting 10 psi
Posts: 30
|
Post by dunz on Aug 13, 2019 8:44:01 GMT -5
Unfortunately I think there still is a small exhaust leak, though I can say it's 95% better than it was! I'll look into it while I'm running it next time.
|
|
|
|
Post by Stinger on Aug 13, 2019 11:05:05 GMT -5
I find my exhaust welds look very similar regardless of whether I weld up or down and whether I use a lot of gun angle or go almost straight in...once the heat and feed speed is right. I use 3/4 for power but it's not a Hobart.
|
|
dunz
Boosting 10 psi
Posts: 30
|
Post by dunz on Aug 13, 2019 11:35:37 GMT -5
I find my exhaust welds look very similar regardless of whether I weld up or down and whether I use a lot of gun angle or go almost straight in...once the heat and feed speed is right. I use 3/4 for power but it's not a Hobart. I think the Hobart and the Miller are kissin cousins. I was just afraid of burning through, but it definitely could have used a bit more heat here. It was more about stick out than the gun angle I think. too much stick out and it would get "Poppy" rather than the nice sizzle. |
|